permaculture, the garden project

Bean wigwam

Lousy weather notwithstanding, I am soldiering onwards with planting in the back garden. (And, indeed, some things are even growing.) This week, it was time to establish the new bean wigwam.

First job was to prise up some more paving slabs, as this is an area I haven’t used before. Next, to shove a few bamboo canes firmly into the ground and tie them together. Here it is, modelled by my glamorous and somewhat grubby assistants Leon and Sidney.

Dog and baby 'helping' spread sand around
Paving slabs up, sticks in, lots of sand (underneath which is London clay).

The other beds are all standard raised beds (made from pallets), but this time I haven’t had a chance to build a proper bed. So for now I’m just piling compost around the poles and planting into that. Leon helped me to trowel compost out of the bag and spread it in a circle.

Finally, after Leon was in bed (so I wouldn’t have to hoick him out of the compost heap), I dug a few spadefuls of not-yet-composted material out of the compost heap, and piled that in the middle of the wigwam. (Ideally I’d have done this before setting up the poles, but baby and dog assistance precluded.) The idea is that the beans will surround this pile as it composts down, creating new soil in the middle of the bed. Once the beans are done for the year I can also chop those off at the base, leaving their roots in place to help improve the ground, and pile the rest of the dead bean plants in over the compost to rot down further over the winter. This bed only gets sun during the summer so won’t be in use in winter anyway.

Bean wigwam and compost

French bean seeds planted around the poles, and I was all done.

the garden project

Making raised beds from pallets

Last week I made a fourth raised bed for the garden; like the previous 3, the wood came from a couple of deconstructed pallets rescued from a nearby skip. It took me just over an hour (with power tools: a hand-held circular saw and a drill with screwdriver fitting; add about another 30-60 min if using hand tools), which did not include the time to deconstruct the pallets. Here’s how I went about it (apologies for the lack of as-you-go photos; I wasn’t thinking of blogging it at the time!).


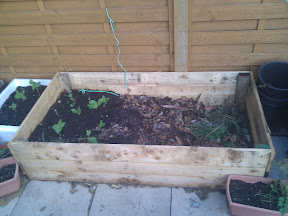
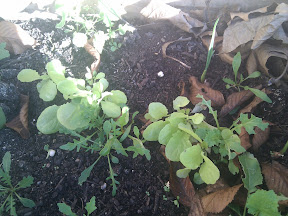
Another of my raised beds, with some broad beans growing in one side. (The other side needs some more compost…)

The basic construction is 3 pallet-planks per side (for a total of 12 needed), cut to the size needed (in my case, 3 paving slab widths on the long sides and 2 on the short, to fit the intended gap). Measure up your planks, and cut them to size.


Long side of raised bed (once complete); 3 135cm planks.


Short side of raised bed (once complete); 3 90cm planks.

The next step is to attach everything together. It’s possible just to nail/screw the planks directly to one another at the corners, but that won’t be very stable. A better bet is to use a thicker piece of wood as a brace at each corner, and screw the planks to that. Happily, pallets are constructed with a couple of nice thick ribs down their middles which are ideal for this. Cut 4 corner braces from this. The length of each brace should match the width of 3 planks, so that it’s the same height as the plank-sides of your raised bed.

Take the first set of three long planks, and two of the corner braces, and screw the planks to the braces at each end. Repeat with the other set of long planks and the other two corner braces. You now have two long sides of a rectangle, each held together by the braces, but not attached to each other.


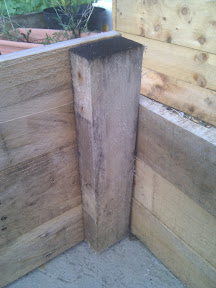
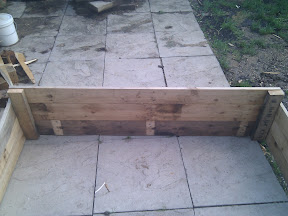
The bracing piece, shown from the inside (with both long and short sides attached).

Now screw the two sets of three shorter planks into the braces at each end, to make the short sides of the rectangle.


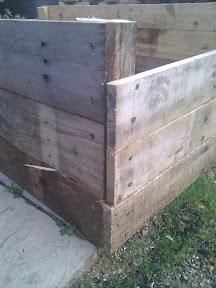
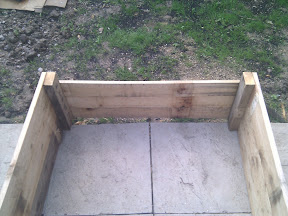
From the outside, planks on two sides screwed to the brace. As a rule, the long and short sides should be the same height, but my planks were slightly different widths and that didn’t quite work out. Aesthetically suboptimal but still perfectly functional!

That’s it! These should be pretty sturdy, especially once filled with soil to strengthen them. You can rest them on existing soil (in my case, where I’ve levered up the paving slabs from the garden), or, if you make them slightly deeper, you can put them straight onto concrete, put cardboard at the bottom and shovel compost in at the top, and treat them as a very large container.

Note on tools and fixings:

  • You can do all of this with a hand saw, and I have done in the past, but a hand-held circular saw makes it all a lot quicker (and in my case, at 7 months pregnant, makes it feasible; I’d have struggled to construct this on my own by hand).
  • Nails can substitute for screws, but they won’t be as secure.
  • Whatever the packet may say, screws go in quicker and easier if you drill pilot holes first. The screwdriver fitting on a power drill is also a godsend, but again, hand tools do the job, just a little slower.
  • A set-square is useful to get the cut lines straight. If you don’t have a set square, all hand saws have a right-angle marker and a 45 degree marker on the handle.
the garden project

Poly-veg winter bed: update

With the single currently-active raised bed in the back garden, I experimented with a winter polyculture, or mixed-veg bed. It’s now looking very healthy, with plants in various stages of growth:

  • Some garlic poking its head up, all around the edge of the bed. Garlic is often a good choice for edging beds, as it’ll help to keep off pests (when they return in the spring). I didn’t get around to getting a decent bulb of garlic from a proper shop, so I just stuck in cloves from a bulb from the Co-op. I wouldn’t want to save any cloves for next year from this crop (since I know nothing about its parentage), but it was a quick and easy solution.

    Garlic shoots, with other greens around them
  • A row of winter lettuce seedlings at the back of the bed.

    Row of small light green winter lettuce seedlings, with some dark green rocket seedlings
  • Some very healthy-looking broccoli raab and turnips (although the turnips themselves are not up to that much; I will use the greens as well when I pull them up, to make the most of the crop).

    Thickly-sown broccoli raab and turnip plants, looking quite intertwined with each other
  • A couple of small chard plants.

    Three small chard plants, surrounded by other greens
  • You may also spot a fair few small rocket plants scattered around the bed. I had lots of rocket seed so scattered it widely. It needs some fairly aggressive thinning, as it’s over-thick, but it’s very tasty so this isn’t a hardship. Having the soil covered thickly like this with plants I do want reduces the number of plants I don’t want (weeds) which can make their way in.

In addition to that lot, there’s a few snow peas and broad beans that aren’t quite up yet, planted where there were some bare patches towards the back of the bed. Looking for bare patches as the crops start to come up, and taking advantage of them, is another principle of polycultures and forest gardening type approaches.

I’ve also constructed another couple of raised beds (one has some broad beans in, but neither are full of compost yet), and transplanted the rosemary to its new home against the fence. The soil here is not great for a Mediterranean herb like rosemary; it’s very clay-heavy, and not well-drained. To give the plant the best chance, we dug a biggish hole and dug in some compost and sharp sand at the bottom of it and around the plant. It’s a sturdy plant (and was badly outgrowing its pot), so hopefully it’ll survive the winter and get going again in the spring. The cuttings that I took (in case it does turn up its roots and die) seem to be doing well so far.

For the end of November, it’s all looking pleasingly green; and I’m still getting regular (albeit small) crops of greens from it.