the garden project

Salad plantings

Also on my March planting list were green salad leaves. All of my preferred green salad leaves are cut-and-come-again types; from a permaculture perspective, that’s a more productive use of the soil as you can keep harvesting throughout the season rather than only getting a once-off harvest then returning to bare earth and having to replant. So I planted sorrel, endive, and rocket, to replace the rocket that’s been growing in the winter veg bed all winter and which will bolt soon.

I was also very pleased to discover a couple of bronze arrowhead seedlings (presumably self-seeded? I’m not sure!) springing up in the pot of my satsuma tree. Bronze arrowhead is one of my favourite lettuces, but I discovered too late that I was out of seed this year. I’ve transplanted the seedlings into the salad veg bed, as they and the satsuma want rather different water conditions, and they’re doing well.

Nothing is growing terribly fast yet, but as of a couple of weeks ago, this was the March-planted corner of my salad veg bed:

You can just about see the seedlings — sorrel and endive in the centre, rocket around the edges — between the cherry blossom fallen from next door’s tree; and the bigger and healthy-looking bronze arrowhead lettuces.

Last week, I planted the April batch of greenery in the next corner of the bed: a different type of oak leaf lettuce, and a batch of Mystery Mixed Lettuces from the Real Seed Company. I’ll be interested to see what I get from those!

growing things, the garden project

Planting tomatoes for this year

It’s spring, so I’ve been doing a lot of planting in the garden. For once I actually have a month by month list, entered into my diary on a weekly basis, as the only way I’ll get things done on time while also wrangling a newborn. I feel alarmingly organised.

Last month was tomato-planting time, so I now have 5 pots of seeds sprouting away on the kitchen windowsill.

Two pots were from packet seeds (Lettuce Leaf, a bush type from the Real Seed Company, though it looks like they no longer stock them, and Peacevine Cherry, from a heirloom packet I got free) which I’ve liked in the past. All the seeds planted of both have germinated and are doing fine. The other 3 were seeds saved from last year’s plants; but only one of them has germinated, which I found a little disappointing.

It turns out that the problem is probably down to a cackhanded effort on my part to increase germination rates. If you’re saving your own seed, you can put the seeds in a jamjar with some water for 3 days, you can improve their germination speed. It turns out, however, that that is a strict 3 days – no more, no less. Five months in the jar? Not so good. Ah well; I have 9 baby tomato plants which is plenty, and will have to try seedsaving again this year. In fact last year’s plants started out at my old house and finished off at this one, so they might not have been the best-adapted to the new location anyway.

In other signs of spring: the apple tree has started to produce green shoots, after a couple of months of looking a lot like a stick.

That was taken a couple of weeks ago; there are more shoots now, all looking pleasingly healthy.

permaculture, the garden project

From pallets to shed

I spent much of February slowly constructing a shed (more of a tool cupboard, really; our garden is very small) from deconstructed pallets.

The first step was to measure up (my shed was 80cm x 60cm in footprint, and spade-height-plus-a-bit in height) and cut the pallet planks to size. I think I used about 2.5 pallets, and a hand-held circular saw (very very useful to speed things up).

I also needed four lengths of 2×2, one per corner, to attach the planks to. My design called for a sloping roof (so the rain runs off), so required two shorter lengths for the back, and two longer for the front. I nailed the back planks to the shorter lengths, and each set of side planks to one of the longer lengths (so at this point the side planks were braced only at one end).


The back wall, screwed into its 2×2 bracing at both ends of the planks.


One of the sides, with only one end braced. Note that its 2×2 rises above the planks; this is because it needed a triangular piece of planking attached later to allow for the slope of the roof.

The next step was to screw the loose ends of each side piece to the 2×2 bracing of the back piece.


Shed with three sides. Note again the space at the top of each side for a triangular piece. (Apologies for the sun flare in the photo!)


Shed corners screwed together.

I measured, cut, and attached triangular pieces for the top of each side (no photos, sorry). For the roof, I cut a piece of plywood which overlapped the sides by about 4-5cm in each direction. I intended to cover this with some thick black plastic left behind by our kitchen fitters, but my Dad came up instead with a roll of roof felt from in his garage, so I was able to do a more professional-looking (and longer-lasting!) job with that, roofing glue, and some roofing nails. Before covering the roof, I screwed in a batten at the back to keep it from sliding off.


The batten on the underside of the roof, and the roofing nails keeping the felt down. The felt was glued down on the topside of the roof.

Since installation, I’ve added a couple of battens at the front to keep it square and to brace the roof.

It still lacks a door (I’m on the look out for some large enough plywood), and at some point I will use a couple of L-shaped metal bits to attach the roof, rather than using bricks to hold it down. But as of now, it does the required job, and, given the high percentage of reused materials, for minimal financial or environmental cost. I’m also kind of proud that I built it at 38 weeks pregnant!

the garden project

Making things

Recently, I have been making things:

Rave baby! (Leon with his hands in the air, aged 1 day)

The second one took a bit longer, and is kind of still under construction.

Actually the shed is also still under construction, lacking as it does a door; it has however had front battens added since that picture. Construction post to follow. I’ve also got going with this spring’s planting in the raised beds over the last month — more to follow on that as well.

the garden project

Making raised beds from pallets

Last week I made a fourth raised bed for the garden; like the previous 3, the wood came from a couple of deconstructed pallets rescued from a nearby skip. It took me just over an hour (with power tools: a hand-held circular saw and a drill with screwdriver fitting; add about another 30-60 min if using hand tools), which did not include the time to deconstruct the pallets. Here’s how I went about it (apologies for the lack of as-you-go photos; I wasn’t thinking of blogging it at the time!).


Another of my raised beds, with some broad beans growing in one side. (The other side needs some more compost…)

The basic construction is 3 pallet-planks per side (for a total of 12 needed), cut to the size needed (in my case, 3 paving slab widths on the long sides and 2 on the short, to fit the intended gap). Measure up your planks, and cut them to size.


Long side of raised bed (once complete); 3 135cm planks.


Short side of raised bed (once complete); 3 90cm planks.

The next step is to attach everything together. It’s possible just to nail/screw the planks directly to one another at the corners, but that won’t be very stable. A better bet is to use a thicker piece of wood as a brace at each corner, and screw the planks to that. Happily, pallets are constructed with a couple of nice thick ribs down their middles which are ideal for this. Cut 4 corner braces from this. The length of each brace should match the width of 3 planks, so that it’s the same height as the plank-sides of your raised bed.

Take the first set of three long planks, and two of the corner braces, and screw the planks to the braces at each end. Repeat with the other set of long planks and the other two corner braces. You now have two long sides of a rectangle, each held together by the braces, but not attached to each other.


The bracing piece, shown from the inside (with both long and short sides attached).

Now screw the two sets of three shorter planks into the braces at each end, to make the short sides of the rectangle.


From the outside, planks on two sides screwed to the brace. As a rule, the long and short sides should be the same height, but my planks were slightly different widths and that didn’t quite work out. Aesthetically suboptimal but still perfectly functional!

That’s it! These should be pretty sturdy, especially once filled with soil to strengthen them. You can rest them on existing soil (in my case, where I’ve levered up the paving slabs from the garden), or, if you make them slightly deeper, you can put them straight onto concrete, put cardboard at the bottom and shovel compost in at the top, and treat them as a very large container.

Note on tools and fixings:

  • You can do all of this with a hand saw, and I have done in the past, but a hand-held circular saw makes it all a lot quicker (and in my case, at 7 months pregnant, makes it feasible; I’d have struggled to construct this on my own by hand).
  • Nails can substitute for screws, but they won’t be as secure.
  • Whatever the packet may say, screws go in quicker and easier if you drill pilot holes first. The screwdriver fitting on a power drill is also a godsend, but again, hand tools do the job, just a little slower.
  • A set-square is useful to get the cut lines straight. If you don’t have a set square, all hand saws have a right-angle marker and a 45 degree marker on the handle.
the garden project

Poly-veg winter bed: update

With the single currently-active raised bed in the back garden, I experimented with a winter polyculture, or mixed-veg bed. It’s now looking very healthy, with plants in various stages of growth:

  • Some garlic poking its head up, all around the edge of the bed. Garlic is often a good choice for edging beds, as it’ll help to keep off pests (when they return in the spring). I didn’t get around to getting a decent bulb of garlic from a proper shop, so I just stuck in cloves from a bulb from the Co-op. I wouldn’t want to save any cloves for next year from this crop (since I know nothing about its parentage), but it was a quick and easy solution.

    Garlic shoots, with other greens around them
  • A row of winter lettuce seedlings at the back of the bed.

    Row of small light green winter lettuce seedlings, with some dark green rocket seedlings
  • Some very healthy-looking broccoli raab and turnips (although the turnips themselves are not up to that much; I will use the greens as well when I pull them up, to make the most of the crop).

    Thickly-sown broccoli raab and turnip plants, looking quite intertwined with each other
  • A couple of small chard plants.

    Three small chard plants, surrounded by other greens
  • You may also spot a fair few small rocket plants scattered around the bed. I had lots of rocket seed so scattered it widely. It needs some fairly aggressive thinning, as it’s over-thick, but it’s very tasty so this isn’t a hardship. Having the soil covered thickly like this with plants I do want reduces the number of plants I don’t want (weeds) which can make their way in.

In addition to that lot, there’s a few snow peas and broad beans that aren’t quite up yet, planted where there were some bare patches towards the back of the bed. Looking for bare patches as the crops start to come up, and taking advantage of them, is another principle of polycultures and forest gardening type approaches.

I’ve also constructed another couple of raised beds (one has some broad beans in, but neither are full of compost yet), and transplanted the rosemary to its new home against the fence. The soil here is not great for a Mediterranean herb like rosemary; it’s very clay-heavy, and not well-drained. To give the plant the best chance, we dug a biggish hole and dug in some compost and sharp sand at the bottom of it and around the plant. It’s a sturdy plant (and was badly outgrowing its pot), so hopefully it’ll survive the winter and get going again in the spring. The cuttings that I took (in case it does turn up its roots and die) seem to be doing well so far.

For the end of November, it’s all looking pleasingly green; and I’m still getting regular (albeit small) crops of greens from it.

the garden project

Cargo bikes, fracking, and raspberries

I have been writing things in other places!

UK Activists Tell Energy Companies To Frack Off.

Kids and cargo bikes. (Since writing that, we’ve decided to go ahead and get the Christiania trike. I am inordinately excited, though we won’t be ordering it for a month or so.)

In ‘garden’ news, yesterday I transplanted 6 raspberry suckers (4 autumn raspberries, 2 summer raspberries) from the allotment to the western garden fence. I’m unsure how they’ll get on with the clay (I dug in a little sand and compost), but as otherwise the suckers would have been snipped up and put in the compost, it’s worth the experiment.

the garden project

Self-fertile apple trees for small gardens

I’m keen to have a fruit tree in our garden, and my mind turned to what’s really the default UK fruit tree: the apple. The thing with apple trees, though (and in fact many fruit trees), is that if you want to get actual fruit, the tree needs to be fertilised. For the vast majority of apple varieties, that means having at least one other apple tree, of the right pollen group and which blossoms at the right time, planted somewhere fairly nearby. In an orchard, a big garden, or even in an allotment where you can count on other allotmenters also having apple trees, that’s fine. If, on the other hand, you have a tiny garden like mine, one tree is going to be pretty much all you can fit in.

Happily, in this modern age, you can get self-fertile apple trees; that is, trees which will pollinate themselves. Even so, they’ll do better (crop more heavily) if pollinated by another nearby tree, but you’ll get a crop anyway. For my purposes, all I want is a few eating apples, and a tree to sit under, so that’ll work fine for me.

The choice, though, is a bit limited — here’s one list*, although note that some of those (the starred ones) are only partly self-fertile, so best to avoid if you don’t want to rely on having another tree in the vicinity. In my case, it’s limited further by the fact that the apples best-liked in our household are the Cox/Russet kind of axis. I couldn’t find any self-fertile russet types, but here is my list of self-fertile Cox-types:

For me, I think it’s a toss-up between Red Windsor and Winston, with a probable bias towards Winston. I shall consult the rest of the household.

A quick note as well on rootstocks. M27 will give you a very small tree (up to 2m), but unless you’re seriously space-limited or growing in a pot, you’re probably better going for M9 (full height up to 2.5m), which is a little bigger and significantly more productive. Both M9 and M27 require permanent staking. If you have the space, M26 is bigger still, and MM106 a decent standard size, growing to 2.5-4.5m. For my 40m2 garden, I’ll be choosing M9 as a good compromise between size and productivity.

* I have noticed some disagreement between different lists on whether or not particular apples are self-fertile. I recommend cross-checking a couple of sources before buying.

the garden project

The Garden Project: quick-win vegetables

So, we planted one side of our new garden with grass already. On the other side (the eastern, and thus west-facing, side), the first quick win was to move the pots of tomatoes and herbs from the old balcony. The west-facing fence was ideal for tying up the tomatoes, and it immediately made the space look more garden-like.

My parents also brought along four or five large polystyrene tubs (from frozen food deliveries) and some bags of compost, so I used those to plant a few turnips and some rocket and mustard greens, all of which do well in late summer. Another good quick win.

My intention is to construct a bunch of raised beds, as the ground underneath the paving slabs is compacted London clay, which hasn’t been cultivated at all for at least a century or so.[0] Instead of trying to improve it enough to grow directly in it, it’s easier to put compost on top and let the soil underneath improve gradually. (It’s also safer, as we don’t know what the ground might be contaminated with, other than certainly lead, like any other patch of inner-city ground.) However, I want to think about the placement of these for a bit, and observe the flows (of sun and frost) in the space, before I do anything too much.

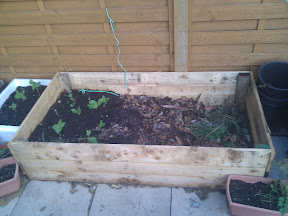
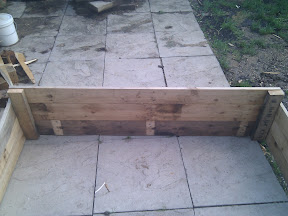
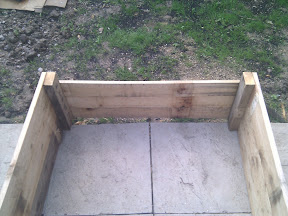
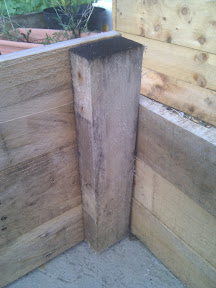
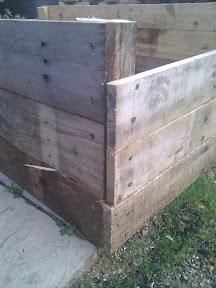
I decided that a single raised bed would be OK: at worst, it would be manageable enough to dump all the soil out of it next spring and relocate it. So I turned a deconstructed pallet into one raised bed, and took out the paving slabs and weed matting under that area. That left me with about an inch of sand, and compacted London clay underneath. I stuck a fork into it all a few times, then dumped some half-rotted leaves and about 100l of old compost/new compost/’soil improver’ (cheap from the Southwark waste recycling centre) on the top of it.

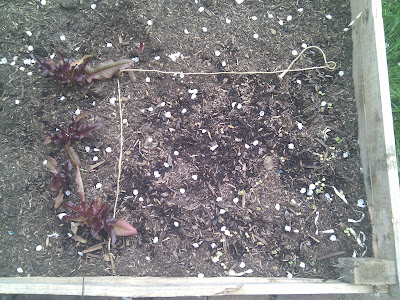
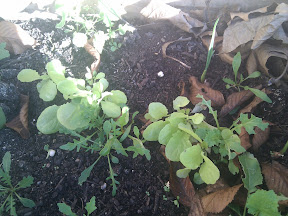
In deciding what to plant, I took the polyculture annual veg approach I learnt in a session on the EAT course. There’s a limit to what will do well planted in late summer, but I started off with a few kale and broccoli raab plants, which by now have a few small edible leaves. A couple of weeks later, I planted a few transplanted turnips (success: middling), some chard, and a lot of rocket and other mixed greens. The salad seedlings are coming up well now, and in a week or so I’ll be able to harvest the first baby chard leaves.

In late September, I planted a row of spring cabbage towards the back of the bed — it may be too late for these to do well, but we’ll see; I might get lucky with the weather. Later this month I’ll plant some garlic around the edges (good for keeping the pests off), and in November, some broad beans wherever there’s a bit of space.

It was definitely worth the effort – even if I end up having to move it in the spring – to have that bed already in place and seedlings growing for the winter. It feels something like a proof-of-concept, or perhaps just a promise to myself that there will be a lot more of these by this time next year.

[0] The house was built in the mid-1990s, on land that used to be occupied by a warehouse, which was there from at least the early 20th century; we’re not sure exactly when it was knocked down, but at best the land will have just been derelict for a bit before the estate was built. Prior to the warehouse, there was either housing, or possibly boat-building, going on in the area.

the garden project

The Garden Project: creating grass

Along with my recently-moved-into new house came a new garden. Specifically, a south-facing space about 8m long by 5m wide (tiny by most people’s standards; pretty decent by local standards; and a huge improvement on the 5m x 1.5m balcony of our previous house). As of our moving-in date, it was entirely paved over, with a single and somewhat overgrown dog rose at the southern, shadiest end.

My overall intention is to spend a few months thinking, from a permaculture perspective, about a proper plan, and start to implement that in the spring. Indeed, ideally I’d wait a whole year before doing anything, but I think by the spring I should have enough information to get going.

However, there were a couple of more urgent issues:

  1. We wanted a patch of grass for the dog more or less immediately.
  2. I wanted some kind of plant-related quick win, to make it more like a garden and less like a very large pavement.

For the grass, then, we went for the quick-and-dirty decision-making process, which looked a bit like this:

  • There’s a patio at the house (north) end, which is solid concrete masquerading as railway sleepers(!). Doing anything with that will be time-consuming and expensive, so for now it stays. So no grass there, leaving the rest of the garden to be considered.
  • We wanted the grass to be accessible directly from the patio, so that it’s useful for humans to meander over and sit on, and so that the dog wouldn’t have to wend her way through the vegetable-growing part of the garden to have a pee. Given the north-south orientation of the garden, that meant a north-south strip.
  • There’s an old gardener’s maxim “west is best”; so I wanted to hang onto the west-facing side of the garden for the veggies.

By process of elimination, we wound up with the east-facing side (the western side) of the garden for the grass.

We started off with a test patch at the bottom of the garden. Unfortunately it turned out that under the ‘easy to lever up’ paving slabs, in a couple of places there were ‘much harder to lever up, and bloody heavy’ concrete slabs. Underneath that was an inch or so of sand, and underneath that, a layer of weed matting. (Under that, highly compacted clay, as one would expect in London.) P succeeded in getting up all the slabs and concrete on the test patch, and ripped up the weed matting. Since grass doesn’t like too rich a soil, we mixed in a lot of old compost with the sand, and dumped some grass and wildflower seed on top of it to see what would happen.

Answer: glorious green success.

This week, D took up the rest of the slabs on that side, forked over the sand and clay and spread a light layer of compost, and we spread more grass and wildflowers over the lot. Hopefully we’ll have at least a little greenery there before the winter sets in properly.

In the next post: pots and a raised bed, for late summer and winter vegetables. (Hopefully also I’ll have added some photos to this post by then.)