growing things, the garden project

Fitting a water butt

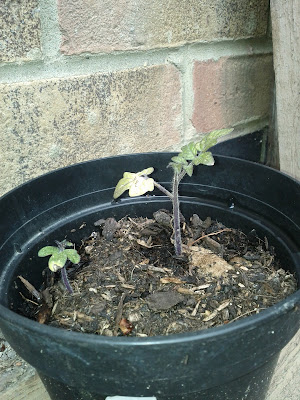
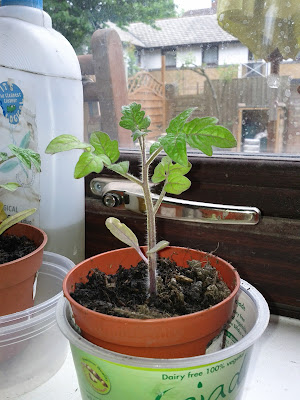
If you grow plants and have access to a gutter downpipe, it’s well worth finding the space and time for a water butt. Rainwater is better for your plants than tap water*; and of course you help conserve water as well.

Water butt against fence

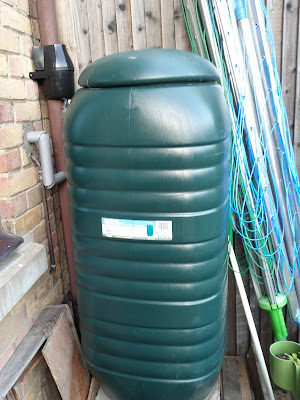
For small spaces you can get slimline water butts; we have room for a 250l one, and it’s worked out very well. This weekend was the first time this year I’ve needed to fill the watering can from the tap. I did put off fitting it for ages, but in fact it was an easier job than I had feared.

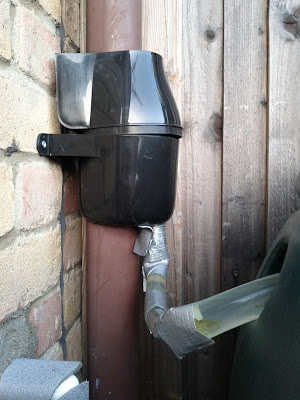
You’ll need a downpipe diverter, and a hacksaw to chop through the downpipe. The diverter kit will have detailed instructions, but basically you cut through the drainpipe at a height just below the top of the water butt. You then connect diverter and water butt with a piece of tubing, and when the water in the butt reaches the level of the drainpipe, the water will flow back into the drainpipe and down the drain. (Here’s a basic explanation of the physics of how water finds its own level; imagine the drainpipe, which is ‘bottomless’, as one of the tubes, and the water butt as the other, with the tubing connecting them.)

A note: when measuring the height of your water butt, it is VERY IMPORTANT to place the water butt high enough off the ground that you can get a watering can in under its tap. We used spare paving slabs; you can also get a purpose-built plastic stand.

Once you’ve cut the drainpipe and fitted the diverter and its tube, that’s it — you’re done, and your water butt is ready to collect water the next time it rains.

The only problem we’ve found so far is that the angle between drainpipe and water butt means that our tubing has a couple of kinks in it that tend to gather gunk & allow algae to grow. This means that it needs to be cleaned out occasionally to keep the water flowing. We’ve just added gaffer tape to reduce the amount of light and thus hopefully also the algae.

Drainpipe diverter and gaffer-taped tube to water butt

Next job: fitting a smaller one on the front balcony. I need to check this with the neighbours first, though, as we share that drainpipe.

* If you can’t use rainwater for watering, when possible it’s a good idea to let tap water sit for 24 hrs before using it on your plants, to allow the chlorine to offgas.

the garden project

The Garden Project: one year in

It’s now just over a year since we moved in to our new house and I started working on the garden.

Unfortunately I don’t have a photo of what it looked like when we moved in. However, the first things we did were to decide which side the grass would be and which side the raised beds would be. Here’s what it looked like after I’d put in the first raised bed and a couple of polystyrene containers, and we’d started taking up paving to put the grass in.

Before that, the whole thing was paving slabs or brick all over, so it was already looking much greener.

Once that experimental grass section proved successful, we got up the paving slabs and the surprise! concrete underneath (thanks to some very hard work from Pete and doop), and got the rest of the grass and wildflower seed down.

With the addition of the herbs and tomatoes in pots from our old balcony, it was looking quite good by October:

(Note also the compost heap at the bottom of the garden by the rose tree, built from the bricks we’d taken up from next to the fence.)

The winter-veg bed did well through the autumn. Over the winter, we put in an apple tree, some raspberries from the allotment, and I built another 3 raised beds from pallets.

I also finished a small shed, also from reconstructed pallets, in February while 38 wks pregnant. (This may have been a form of nesting; 600l of compost for the remaining raised beds also arrived two days before the baby did after a last-minute order.)

And over the spring I planted salad leaves, tomatoes, carrots, turnips, peas and beans, courgettes, more raspberries, rhubarb, and some flowers. In June, it was all doing rather well.

And a year on, it looks like this.

Not bad going, I think.

the garden project

The Garden Project: August update

Suddenly there is sunshine, after what felt like weeks and weeks of rain and grey skies. Here’s a quick roundup of things in the garden:

  • Fruit:
    • Two apples on the tree (I took a couple off when they first appeared, to reduce the load on the tree in its first year[0]).
    • A handful of raspberries, and the autumn raspberries flowering.
    • A handful of strawberries from three troughs.
    • Two rhubarb crowns transplanted from the allotment are doing well after wilting heavily at first.
  • Salad veg:
    • The bronze arrow-head lettuce has gone spectacularly to seed, with flower heads that are several feet tall. I’m hoping it’ll self-seed cleanly, but I’m not sure if there’s anything else around that crosses with it.
    • The rocket jungle, though extensive, is getting a bit too peppery as it too goes to seed. I may hoick some of the plants up as there really is a lot of it. It’s also self-seeded into the gaps between the paving slabs.
    • The misc lettuce still cropping happily in the salad bed.
  • Other veg:
    • The courgettes have started cropping and we’ve eaten the first couple.
    • The chard hasn’t really germinated terribly well. There are a couple of plants but I was hoping for more. Intending to replant for an autumn/winter crop.
    • No sign at all of the pak choi. Again, I’ll try replanting.
    • We had a reasonable crop of peas but those have gone now.
    • The tomatoes are growing away happily. The ones in the self-watering containers are doing noticeably better than the others.
    • The turnips doing well and we’ve already eaten the first row. Intending to plant another couple of rows for a late-summer crop.
    • There are plenty of carrots but they’re not growing all that fast. I’ve always struggled with carrots!
    • Very few beets germinated from the row I planted. Given the close relationship between beetroot and chard and the poor germination rates for both, I’m wondering if the conditions were just bad for these plants. (Alternatively, I may have had old seed as I’ve been using up seed from older packets.)

Things to plant in the next month:

  • Turnips.
  • Chard.
  • Pak choi.
  • Perhaps some winter cabbage or lettuce?
  • Rocket, except I won’t need to deliberately plant that as it’s happily planting itself.

[0] We bought it as a 3-yr-old tree; if it were actually a maiden I’d have removed all of the fruit in its first year.

the balcony project

Watering upstairs

We have some plants on the first floor; a few on the windowsills, and a few more now on the balcony (see The Balcony Project). We do not have any water on the first floor. So far, my watering has been at best intermittent (though given the recent weather this hardly matters for the balcony); what I’d like to do is to set something up to make it more reliable.

Currently, if I want to water the indoor plants, I have to pick up the small watering can, go downstairs and fill in, come back up and water. To water the balcony, I need to get the large watering can from the back garden, fill it, come back up, water, and take the watering can back down again.

The time when it would be easiest to water, and when I’m most likely to remember, is when L is playing on the floor; but I don’t want to be running up and down the stairs too much at that point. (Having said which – I could associate it with making myself a mug of tea.)

So; what might make this easier:
– having a watering can on the balcony?
– having a water container upstairs (perhaps on the desk) that I fill up on a more regular basis and then have available to water from?
– emptying half-glasses of water into one of these containers before clearing them downstairs?

So far that’s it on the ideas front & I’m not very convinced by anything there. Any other suggestions?

the balcony project

The Balcony Project: plants for north-facing spaces

The next stage in the balcony planning is a little research on plants that will do well in north-facing areas. Given my other requirements, I’m most interested in edibles, and perennials or self-seekers (for minimal ongoing maintenance).

It’s a good idea to remember the difference between different types of shade: ‘open’, ‘medium’, and ‘deep’ shade. I have open shade (north-facing, but nothing much overshadowing it) which makes life a little easier.

In a small space it’s even more important than usual to consider height as wel as ground space, and I have a small area of wall and a railing available. Here’s a few potential plants:

Climbers and shrubs

  • Oregon Thornless blackberry: can be grown in a pot (2′ square x 2.5′ deep, ideally) and carefully trained up a trellis. It would need regular maintenance not to overrun next door’s balcony. But I do like blackberries, and in a pot it would be less of a menace than they are in the ground. It flowers on one-year-old wood.
  • Kiwi vines: will fruit in the shade, and could grow along the railing. I’d need a male and female plant, so one at each end. However, they would block the view through the railings onto the river, which is really valuable to me.
  • Honeyberry: prefers partial shade, so in that sense ideal. However, you need two plants (male and female), and they grow to 5′ so need a half barrel sized pot per plant. I think it’s either this or the blackberry.

Flowers

  • Plumbago: perennial, butterflies love it, but not edible.
  • Violet: edible, perennial, one of my favourites anyway.

Herbs, greens, etc

  • Mint: that old favourite for shady areas. I don’t actually use it much in cooking, but mint tea is nice, and mint, apple juice, vodka and ice is a lovely summer cocktail. Smells great on the balcony, too. I have a plant in the garden so would be easy to propagate.
  • New Zealand spinach: a new one on me. Perennial, best started from transplant, and needs blanching before cooking so realistically probably wouldn’t get used.
  • Chard, beets, other leafy greens: if they’re on the balcony, they won’t be readily harvestable for the kitchen, so we’re unlikely to use them.
  • Peas: in theory the above would also apply, except that raw peas fresh from the pod taste fantastic, so could be eaten on the spot.
  • Salad greens: could be eaten on the spot, so might be worth it, especially as the baby gets bigger and might be in and out of there more. Planting in partial north-facing shade might give some resistance to bolting and mean we get a midsummer crop, which is not possible in the south-facing and very warm back garden. I have plenty of salad green seeds so may try this out.
  • Alpine strawberries: very very tasty. Definitely try these next year.
  • Rhubarb: shade-tolerant, can be grown in a pot, but we already have it in the garden and it is quite large.

I did also find a list of some other shade-tolerant edibles, but they all seem a bit big for my purposes.

Now I have the list, the next step is to construct a plan. Watch this space…

Tip o’ the hat to: the Savvy Gardener on gardening in the shade, and Life on the Balcony on shade-tolerant fruit.

the garden project

Garden update

Despite the erratic weather, things in the garden are moving on happily. A quick list (no photos this time, may try to add some tomorrow):

  • Apples on the apple tree! Research suggests that as this is a 3-yr-old tree, I should thin the apples a little but don’t need to remove them all. So am hoping for at least one apple from the tree this year.
  • Tomatoes now planted out. Two in a polystyrene tub, two in the back of one of the raised beds, three in self-watering containers, and I will see which do best. My bet is on the SWCs. They’re all up against a west-facing fence so should get plenty of sun.
  • The broad beans have all come out now. A middling harvest; the ones in the raised beds did fine (although hard to get at the ones at the back for harvesting), but the ones in the polystyrene tubs did quite badly. I think they really need more space for their roots.
  • Peas are growing away merrily and have just started to flower.
  • Turnips also doing very well; thinned out last week and nibbled on a few of the thinnings raw.
  • Rocket heading rapidly to seed, so very very peppery.
  • Lettuces doing great and I really must eat more of them for my lunches!
  • Nearly none of the beets or chard have come up. I am wondering if the seeds were past it? Will get new seeds to plant for chard to overwinter, anyway.
  • Courgettes flowering but not yet any female flowers, only male ones. That quite often happens initially, so I’m happy to contain myself in patience.

I have a spare half-bed that I’m not sure what to do with; and a squash in a small pot that badly needs to go down to the allotment as there’s no room for it to do well in the garden.

permaculture, the balcony project

The Balcony Project: sector & zone analysis

I’m planning planting for our balcony, and in my last post on this wrote up the surveying. The next step is to do the analysis: some possible approaches are to consider zones, sectors, and input/output.

For this project zones aren’t particularly useful. In theory it’s all zone 1 (close by house, for high-maintenance plants), but in fact due to the low foot traffic (see below) I may treat it as edging towards zone 2 (lower maintenance perennials).

Sectors:
– Sun: direct sunlight only during summer evenings, otherwise shady but bright. Need shade-tolerant plants.
– Wind: comes off the river. Some protection, but plants need to be quite robust.
– People: space not very well-used. Focus planting on area visible from indoors, being careful not to block view of river through door! Minimal maintenance as not heavily used.
– Water: edges get some rain, but assume water needs to be carried up. Plants should be drought-tolerant if possible but not drought-requiring.

Input/output: required inputs are soil/compost, containers, water, fertiliser, plants or seeds. Outputs are vegetable matter for compost, perhaps some food, beauty (!), perhaps seeds or potential cuttings. The compost heap in the back garden can help link some outputs to some inputs, and I can also use seeds and cuttings from there and from my parents’ garden. It may be worth considering a water butt.

Anything else I’m missing?

Next post in this series: plants, locations, and solutions that might work.

the balcony project

The Balcony Project: surveying

In addition to the back garden, we also have a front balcony. Now that the garden is well under way, I want to tackle some container planting for it.

The first stage of the permaculture design process is surveying: site, resources, and client requirements.

Site

  • North-facing, though not overshadowed, so some evening sunlight especially in summer.
  • Paved.
  • First floor (so need to watch the weight!).
  • 4.5m x 1m.
  • No water supply (any water has to be brought up from the ground floor). However, there is a drainpipe at the corner (possibly shared with next door?). Slight overhang above so doesn’t get much rainfall either.
  • Fairly windy, but with some protection to about a metre up.
  • Some containers, but nothing fixed.
  • Railing provides some potential support for climbing plants.

Resources

  • Plenty of containers of various sorts available.
  • Some already-planted containers: violas, primroses, pansies, evening primrose.
  • Possibility of propagating some plants from the back garden (or using some of my seed collection).
  • Some compost from the back garden compost heap, but is likely to need supplementing with bought compost (or wait for longer to plant more!).

Client requirements

  • Enough space to sit out on folding chairs.
  • Attractive when seen through balcony window — I’d like some flowers!
  • Attractive during the winter — at least something that will survive or even thrive through winter.
  • Nothing poisonous to dog or baby if they eat it.
  • At least one food-productive plant.
  • Minimal cost setup.
  • Neglect-tolerant / low maintenance.

The next part of the process is the analysis: sectors, zones, and input/output, which I’ll consider in the next post, before coming to the design.

growing things

Protecting tomato seedlings

A quick photo to illustrate why it’s worth keeping tomato seedlings inside (or in a greenhouse) for that little bit longer, rather than just dumping them outside once they’ve grown their first couple of leaves and been transplanted. These are the same type of tomato and were sown at the same time:

Tomato seedling with 2 leaves, looking a bit yellow, in a pot outside
Transplanted and put straight outside

Tomato seedling with 4 leaves in small pot on windowsill
Transplanted and given another week on the windowsill

Not only does the indoor one have a healthier colour, it also has an extra pair of leaves. I’m hoping that the outdoor one will pick up in time but it’ll certainly take longer to reach fruiting stage.

I am considering a further experiment by picking one plant to put straight out from the windowsill without hardening off, and comparing that a week or so later with its hardened-off siblings.

growing things, the garden project

Flowers: permaculture and beauty

Permaculture isn’t only about the practical; or rather, “practical” covers more than you might think. Permaculture is all about sustainability, and that includes creating environments which are sustainable for humans in respect to all their needs.

A garden needn’t just be about food to be practical, sustaining, and sustainable; it can also be about beauty, or fun, or rest. Of course, food plants can also be beautiful (rainbow chard is one excellent example; or the little blue flowers that appeared on my rosemary bush in early spring). But the beauty in non-edible plants means that they’re also a worthwhile addition to the garden, simply for the joy of looking at them. And a garden you want to spend time in is invariably a more productive garden.

Which is to say that I have a bunch of flowers in our garden now, along the western fence by the rosemary and the raspberries. The first to go in, last autumn, were winter pansies. Pansies are my favourite flower, and their January blooms cheered me up no end. More recently I put in some forget-me-nots, which are very practical flowers in that they are self-seeding, but easy to pull out, so low maintenance in both directions. As mentioned in the peas and beans post, there are also now a few pots of sweet peas to make the patio smell lovely when they flower. And finally, a few evening primroses in with the pansies, because my Mum had some spares and it would have been a shame to waste them. (Actually, all the flowers were spares from my Mum. Thank you!).

Winter pansies and raspberries against a wooden fence
Pansies and raspberries (and some purple wild flowers that I don’t know the name of) earlier in the spring